Tuesday, April 8, 2014

Fun Bold Colored Baby Single Page Layout


Scrapbooking little people is such a joy!  

There are as many as five different papers on this project: One sheet solid background cardstock, a stripe, a large primary dot, and a small dot, and matting cardstock. (I no longer have a record of which paper lines were used. I think the background page is Bazill Basics, the small dot from a Christmas line. I just am not sure about the rest - sorry) There is one fancy brad, three ribbon segments, a tiny binderclip, ink for edges, and pen. 

The LO is 12x12. All paper edges are inked. 
The large dot is six inches wide. Each stripe is an inch wide. The stripe sheets are layered along the edge under the large dots. The upper stripe sheet begins one and a half inches from the top edge. All photos are matted and the matt inked. The small dot paper was cut into letters using a Slice machine. They were then inked. The ribbon was cut into three inch segments and carefully tied onto the tiny binderclip. I 'fussy cut' a cute circular saying and placed the fancy brad in the center of the sentiment, and again inked the edges. I used a pen to create dotted lines giving each letter visual bounce. 

Hope that enjoy this single page layout. Feel free to scraplift this idea. I would love to see your take on it so email me a pic!

I gotta JUMP! 
Have a great day my crafty darlings!


Tuesday, March 25, 2014

Soap and washcloth reindeer

Yuletide Washcloth and Soap Sachet Reindeer Novelty Gift

I enjoy an extended family Yuletide gathering yearly and I like to include something fun and crafty. This year I decided to go with these adorable little washcloth and soap reindeer. I learned this in childhood as a girl scout and found it fun at that time - and somethings never change! They are still fun to make. ☺

Party favor and teacher gift alert! When making several the cost is about $2.25 each. Most of the items necessary to complete the project come from the dollar store! I made more then a dozen this time and my kiddies sure enjoyed participating in the project. These little reindeer are super cute and make people smile! They're so easy and fast to create too.  It's a win-win.


soap that smells amazing!
From the Dollar Tree store:


  • Tan plain wash clothes (2 per pack)
  • Festive ribbon
  • Red/Green/Black/White pom pom for the nose (1 pack did several projects including these)
  • Googly eyes (1 pack did several projects including a dozen+ of these)


Fun way to transport non-flying reindeer!
The things that did not come from the dollar store-


  • Brown pipe cleaners (find them here walmart)
  • Hot glue gun & glue for it (Not a new buy had on hand for years!)
  • Bar of soap that smells good (I used Texas Scents Soap see photo which were $2 each and smell heavenly!)


This is a great project to share with your kiddies! It is very simple indeed! (Just remember that hot glue guns require adult supervision - but you already knew that.)

(Also in case you were wondering, the red bucket in the photo was available in Walmart in May of 2013.)


Got Reindeer?

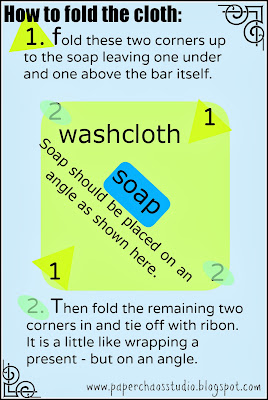
Once your folding and ribboning is completed (as shown on the left) you can move on to antler creating. Fold a single long brown pipe cleaner in half so you have a giant V. Then hold the base of the V in one hand and bend the top of the emerging antlers to and fro. Once they look antler-like to you just insert the V you were holding into the center of the ribbon-gathered washcloth. Voila you got antlers baby! 

Glue the eyes and pompoms on in the appropriate locations and allow to dry/cool. That's it! You got nifty gifty reindeer! 

Tuesday, March 11, 2014

Valentine Fun


The Valentines double! These were fantastic and fun little things to make!

First the wooden sentiment piece:

We made a couple of these little dandies to give this Valentines day. My girlfriend Gypsy cut the vinyl and wood. (Yes, she is aaaahmazing)

The kids did the rest.

First the kids donned art smocks. The process included painting all surfaces of the wood and letting it dry. The key to this is using a disposable cheap-o table cloth so the kiddies have plenty of room for paint without destruction of the room! Also - there is no substitute for supervision.... haha as one of them told me "we already see great!"

Then the kids sanded the project wood with strips of sand paper in the back yard. They went over all surfaces but especially the corners. I wiped the dust off with a damp paper towel.

I helped them place each vinyl sentiment on the project and they rubbed like crazy. (Fun stuff I tell ya..) Then they used red sharpie marker on the rear of the wood to add a personal message. Once the marker was all dry they covered the entire project with ModgePodge. That too had to dry and it takes a while. Overnight in this case. So imagine the Jeopardy theme song and fast forward about 20 hours......

The kiddies were very excited to finish up their now dry project. (boy 20 hours went by fast!)
The final touch was adhering a red ribbon. We glued it in place. Voila!

Next the mantle candy candle:

I like Pinterest. It is really addicting, and fun, and full of great ideas! I got this idea on Pinterest.

I bought some dollar glass candle bowls, votive candles, and traditional Valentines candy conversation hearts. I poured two boxes of hearts into each bowl and placed a candle on top. I lined them up along the mantles edge and it really did look cute! They cost a total of $1.75 each. I plan to reuse the candle bowls in similar ways for other holidays and seasons.

I made this at Gypsys place. I thought i'd share it here since it is part of my Valentines mantlescape. It is painted red and sanded. The letters are vinyl and that is bakers twine in the center. I had such a great time making this project. 


There you go. Happy Hearts Day my lovelies with Hugs!


Tuesday, February 25, 2014

Colorful giant granny square throw blanket

My mother asked me to create a soft warm blanket that she could get snuggled up in while sitting in her favorite chair reading. At the same time she did not want it to be any larger then necessary. Thus a large square was perfect.


I set out to find just the right yarn. My mother has a lot of earth tones punctuated with pops of jewel tones in her southwest decor. I really like the yarn lines by  Deborah Norville. Keeping my mother's decor in mind I used two skein colors for this blanket - black and Carnivale. Carnivale has teal, rust, gold, and plum. This yarn is nice and firm while remaining soft to the touch. I have also found that it washes well and is nice and warm. None of that funky crinkle & crackle or pilling - if you know what I mean!

I worked this a little at a time in the evening for a couple of weeks. I had a lot of lifes happy interruptions :) or it would have been quicker. There is no real pattern. I just began with a very simple granny square and worked out until I had a very large square. I alternated between the two colors creating the varying size band of each color.

I really like how it turned out and so does my Mom. It looks great in her space too. I think I'll make another in some other shades for my own space.

Happy creating my loves!


Tuesday, February 18, 2014

Classy Framed Wipe-off Board

Hey ya'll creative folks!

I got the pretty and classy framed wipe-off board made for about $5! It was quick and easy too. The hardest part was gathering the materials. Here's your list:


  • Frame with real glass 
  • Scrapbook paper that matches your decor
  • Wipe-off markers
  • FLAT Embellishments
  • Cutter
  • Scrappy glue


You need real glass to write on and wipe-off long term. The plastic sheets just don't hold up to the cleaning of the ink. Also you need flat embellishments because otherwise your frame wont close properly and will look wonky.

I got my frame in the largest size and cheapest price I could at Walmart. I cleaned the frame and glass on both sides. Then I removed the contents of the frame and used the display paper for my template. I began with heavy patterned cardstock and layered the paper and some embellishments flat and glued it all down. Once dry I closed up the frame and hung it on the wall. It was so easy and looks so nice!

I apologize but I glued it all together and now am not sure which paper line I used. If I figure it out I'll update the post. Wish I'd thought of it at the time. I was just cuttin', gluin', and groovin' to the radio and totally got into my crafty zone - what? You mean you don't get lost that way too? naaah.... lol

HUGS creative peeps!

Tuesday, February 4, 2014

Quick Warm Infinity Scarf from ONE skein of yarn!


Greetings artsy peeps! 

I was browsing through the yarn section of JoAnn store recently during a yarn sale and came across the Lion brand Homespun series 'thick and quick'. (My store did not have as much selection as the website) They looked really fluffy and the ones I used are rated super bulky. I decided to buy a skein whose color, Greystone - just really called out to me. Since most projects take a few skeins I bought three - which was way too many! 


I also recently began playing with the Crochet Dude giant crochet hook. I used the big one in the middle of the pack. I absolutely LOVE this hook! I would like to play with an even bigger one but have not yet found one to try. Maybe like an inch around could be awesome!


I began my adventure on the sofa before supper with a crackling fire and Christmas lights aglow. By the time I went to bed I had used the entire first skein and thus completed an entire infinity scarf! I was surprised because things always take longer then that! It came out nice and chunky and fluffy! I was so jazzed that I had to share it here.


Not only was I so jazzed I had to share - but I decided to use the afore mentioned giant hook to make another infinity scarf for myself this time in winter white. When I went back to the store I could not get the same yarn in the creamy color I was dreaming of so I decided to try another product that was in stock. The pearly creamy romantic white was just what I had in mind. It is called Cafe au Lait. The color is beautiful and the website does not do it justice. It even sounds yummy!

There is no pattern per se. I used a waffle stitch for the dark scarf and a single crochet for the pearly one. I just worked each until I got to the end of each skein. Simple is really the best in my book :) 


I am thrilled with how they each turned out and I love how they look on me. They are both warm and soft and washed well.I did have a few observations to share with you though. There is not quite as much in the Red Heart skein as there was in the Lionbrand skein so the darker scarf is a larger infinity loop. Also both got even more fuzzy after washing and drying gently. The white is slightly crunchy but not enough to be annoying while the dark completely lacks crunch.

Thursday, January 23, 2014

Unboxing A whole year of new Yankee Candles!


Just recently I saw that Yankee Candles were having a January sale where you can purchase six of the larger candles for $60 online and shipping was $5 dollars! I happen to really enjoy good smellin' candles so I was all too happy to discover said sale!


Although I have been gifted their candles, and browsed their location in the mall - I have never ordered from them before and I was seriously excited! I chose the largest sizes available for the scents I wanted.  Candle scents for each season was my aim. A whole year of candle joy!


They arrived on my porch in two boxes on a chilly morning. We opened the box and discovered that they had been well packaged for their journey to us. It was kinda fun taking the cold candles out of the boxes. Each arrived in perfect and great smelling condition.


I received a yummy smelling candle for Christmas and have been enjoying it very much. The Vanilla Frosting scented candle we have already been using is almost gone so these came at just the right time. The new candle we chose to enjoy now is Season of Peace.


Wow, Season of Peace smells really good! It is a pleasant clean relaxing sort of scent. Familiar yet I cannot place it.  I wish they would keep it year round because its a keeper!


Good times - good smelling times that is!